57. Daylight Robbery
- Necromunda: Apocrypha Necromunda
- White Dwarf 449, Return to Zone Mortalis (12/2019)
RAW ✔️ Source: Necromunda: Apocrypha Necromunda, originally published in White Dwarf 449, Return to Zone Mortalis (12/2019)
The scenarios presented here are intended to make for quick games, perhaps played over a lunch break, or to allow several, smaller games to be played in an evening. In Campaign play, these scenarios are perfect for players wishing to strike at their opponents without risking their whole gang, or for gangs who have several fighters In Recovery, allowing a gang to grow even when severely depleted. If both players agree, the winner of a pre-game roll-off can choose to play one of these scenarios. Players can also agree between themselves to play one of these scenarios instead of rolling off in the pre-game sequence. In an Arbitrated campaign, the Arbitrator may decide that one of these scenarios should be used at any given time if one player is particularly disadvantaged due to injuries.
"No-one's around, it's our lucky day lads!"
- Shale Lind, Gunk Riders, House Orlock, shortly before their capture by the Wyld Panthers
In this scenario, a small group of gangers come across a lightly defended warehouse and attempt to loot it before they're caught.
Attacker and Defender
In this scenario, one gang is the attacker and the other is the defender. If this scenario is being played as part of a campaign, then the gang that issued the challenge is the attacker; otherwise, roll off with the winner deciding whether they will attack or defend.
Battle Type
This scenario is an Underhive battle; vehicles and Wargear that grant the Mounted condition cannot be included in either gang's starting crew or Reinforcements.
Battlefield
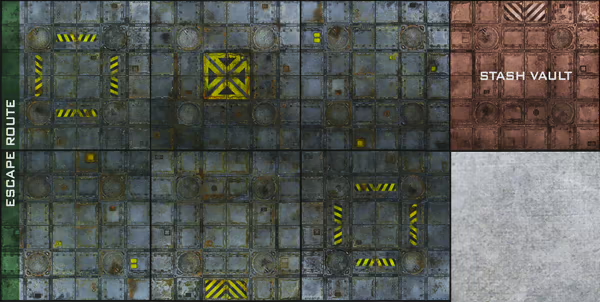
Starting with the defender, the players take it in turns to deploy six Zone Mortalis floor tiles (either card tiles or plastic tiles complete with walls) in a 3'x2' rectangle. The defender then places one more tile adjacent to either short edge – this is the vault in which the defender keeps their Stash. The short edge opposite the Stash vault is the escape route. In this scenario, the defender may place all of the barricades.
Crews
This scenario uses the standard rules for choosing a crew, as described in the Battlefield Set-up & Scenarios section of the Necromunda Core Rulebook. The attacker uses the Custom Selection (3) method to determine their crew. The defender uses the Hybrid Selection (3+3) method to determine their crew. Three of these fighters are randomly selected to deploy at the start of the battle, the remaining three are set aside to form the Reinforcements deck.
Deployment
The attacker deploys their entire crew within the vault. One of the attacking fighters must be given possession of the Stash marker (see opposite). The defender then deploys their fighters anywhere on the battlefield, at least 6" away from an enemy fighter.
Gang Tactics
This scenario uses the standard rules for gang tactics as described in the Battlefield Set-up & Scenarios section of the Necromunda Core Rulebook.
Ending the Battle
If either gang has no fighters left on the battlefield at the end of any round, the battle ends immediately.
Victory
If, at the end of the battle, one (or more) of the attacking fighters has taken flight (see opposite) and if the Stash marker has been claimed, the attacker is victorious. Otherwise, the defender is victorious.
Rewards
Credits
If the attacker is victorious, they earn D6x10 credits.
Experience
The Leader of the winning gang earns 1 XP (despite not taking part in the battle).
Reputation
If the attacker is victorious, they gain 2 Reputation.
If the defender is victorious, they gain D3+1 Reputation.
If either gang bottled out, they lose 1 Reputation.
Home Turf Advantage
The defender has the Home Turf Advantage as described in the Battlefield Set-up & Scenarios section of the Necromunda Core Rulebook.
The Stash Marker
At the start of the battle, the attackers have broken into the defender's vault to steal something of great value. This is represented by the Stash marker, which can be represented by any suitable card marker, or modelled onto a 25mm base.
As mentioned previously, the attacking player gives the Stash marker to one of their fighters during deployment. It is the job of this fighter to take flight with the stolen goods. Should the fighter in possession of the Stash marker take flight (as described as follows), the attacking gang is said to have claimed the Stash marker.
If the Stash marker is not in the possession of a fighter, it can be picked up by any fighter that starts or ends an action within 1" of the marker, provided there are no enemy fighters within 1" of them at the time. Grabbing the Stash marker does not cost an action.
The fighter in possession of the Stash marker is not hindered by it and is able to act normally during their activations. In addition, if the fighter in possession of the Stash marker is Standing and Active, Prone and Pinned, or Prone and Seriously Injured, they may perform the "Take It!" (Basic) action:
"Take It!" (Basic): If this fighter is in possession of the Stash marker, they may hand it to a Standing and Active friendly fighter that is within 1" of this fighter. That fighter immediately takes possession of the Stash marker.
Dropping The Stash
Should the fighter in possession of the Stash marker be taken Out of Action, they will drop it. Immediately before removing the fighter from play, place the Stash marker on the battlefield, anywhere within 1" of the fighter.
Taking Flight
An attacking fighter can take flight from the battlefield during any End phase if they are within 1" of the escape route (the short edge of the battlefield, furthest from the vault) and if there are no enemy fighters within 1" of them.
Only One Way Out
For the attacking fighters, there's only one way out – through the enemy gang. During this scenario, the attacker does not take Bottle checks and cannot voluntarily flee the battlefield. If the attacker loses, any attacking fighters that did not take flight are automatically Captured by the defender.
Fleeing the Battlefield
If the defender voluntarily bottles out and subsequently flees the battlefield, the attacker automatically wins the scenario. In addition, the attacker has the time to grab a few extra valuables, adding D3x5 credits to their winnings.
Reinforcements
At the start of the fourth round's End phase, all of the defender's Reinforcements arrive. In this scenario, Reinforcements are deployed by the controlling player anywhere within 1" of the escape route, but not within 2" of an attacking fighter.
Arbitrating The Scenario
At the Arbitrator's discretion, they can take part in this scenario by fielding a gang of Watchmen. This could be a group of Guilder guards or an Enforcer patrol, or whatever else the Arbitrator wishes.
In addition, if the Arbitrator wishes, two players can take part, both starting the battle as allies in crime, both with three fighters in the vault. From there, they must escape past the Arbitrator's gang. If they succeed, they can split the winnings equally between them. That is, of course, if they don't betray one another!
If two gangs take part, the Arbitrator should double the size of their starting crew to 12, 6 of which will be Reinforcements.
RAW ✔️ Source: White Dwarf 449, Return to Zone Mortalis (12/2019)
Attackers and Defenders
In this scenario, one gang is the attacker and the other is the defender. In a campaign, the player who chose this scenario is the attacker. In a skirmish, players roll off and the winner decides whether they will attack or defend.
Battlefield
Starting with the defender, the players take it in turns to deploy six Zone Mortalis Floor tiles (either card tiles or plastic terrain) in a 3'x2' rectangle. The defender then deploys one tile adjacent to a tile along either short edge - this is the vault in which the defender keeps their stash. The short edge opposite the stash vault is the escape route. In this scenario the defender may place all of the barricades.
Crews
The defender uses the Random Selection (6) method to choose their crew. After the defender has dealt out their starting crew, they shuffle the selected cards and randomly select three fighters - the remaining three cards are set to one side to form their Reinforcement deck. The attacker uses the Custom Selection (3) method to choose their crew.
Home Turf Advantage
The defender has Home Turf Advantage.
Tactics Cards
The attacker can choose up to two Tactics cards. The defender shuffles their deck and draws two cards at random.
If, during the pre-battle sequence, the total credits value of fighters in one player's starting crew is less than their opponent's, they may randomly draw an additional Tactics card for each full 100 credits of difference.
Deployment
The attacker deploys their entire crew within the stash vault. They then give one of their fighters a Stash marker. The defender then deploys their fighters anywhere on the battlefield more than 6" from an enemy fighter.
Objectives
The attacker is attempting to escape with their pilfered loot. The defender is trying to stop this from happening.
Reinforcements
At the start of the fourth turn's End phase, all of the defender's Reinforcements arrive. In this scenario, Reinforcements are deployed by the controlling player anywhere within 1" of the escape route and not within 2" of an attacking fighter.
Claiming the Stash and Taking Flight
Any attacking fighter that is within 1" of the escape route at the start of any End phase can Take Flight if their controlling player wishes, even if they are Seriously Injured. The fighter is removed from the battlefield, and counts as being Out of Action from now on for the purposes of Bottle tests. In addition, if the Stash marker is within 111 of the escape route when a fighter Takes Flight, it is claimed and removed from the battlefield.
Special Rule: Go Through Them
For the attackers there's only one way out - through the opposing gang. The attacker does not take Bottle tests during this scenario. The attacker cannot voluntarily flee the battlefield.
Ending the Battle
If either gang has no fighters left on the battlefield at the end of any round, the battle ends immediately.
Fleeing the Battlefield
If the defender voluntarily bottles out and flees the battlefield, their opponent automatically wins the scenario and claims the Stash marker.
Victory
The attacker wins if one or more of their fighters has Taken Flight and the Stash marker has been claimed. Otherwise, the defender wins.Rewards (Campaigns Only)
Credits
The attacker earns D6x10 credits if the Stash marker is claimed.
Experience
- Each fighter that took part in the battle earns 1 XP.
- The Leader of the winning gang gains an additional 1 XP (regardless of whether they took part in the battle or not).
Reputation
- The attacker gains 2 Reputation if the Stash marker is claimed.
- The defender gains D3+1 Reputation if they are victorious. If either gang bottled out, they lose 1 Reputation.
Arbitrating the Scenario
If this is an Arbitrated scenario, the Arbitrator can either run a gang tasked with defending the vault or make up a gang of Guilder Watchmen assigned to protect the goods of a guilder or an Enforcer patrol who caught the gang in the act.