Open Hive War
RAW ✔️ Source: Open Hive War Card Pack
Open Hive War was a set of 50 cards for use in Necromunda games. It is now out of production.
This set contained:
- 2 Hive War Instructions Cards
- 12 Deployment Cards
- 12 Objective Cards
- 12 Loot Cards
- 12 Peril Cards
Using The Hive War Cards
Card Draw
Divide the cards into decks: Deployment, Objective, Loot and Perils. Shuffle them and draw a single card from Deployment, Objective and Perils, turning each face-up for both players to see. Both players then draw a Loot card, keeping it secret from their opponent.
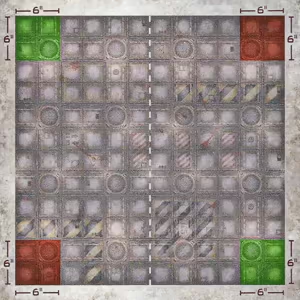
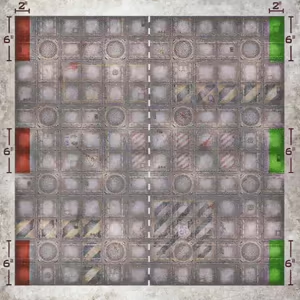
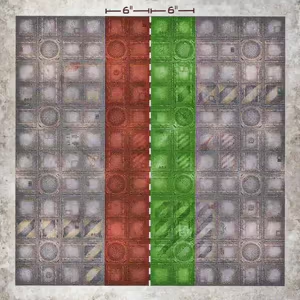
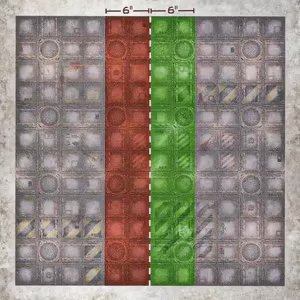
Deployment Cards
Deployment cards detail where the players deploy their crews on the battlefield.
Objective Cards
Objective cards detail the victory conditions for the battle. Before crews have been deployed, place Objective markers (If any) as detailed by the Objective card. Objectives cannot be placed in Impassable terrain or within 2" of another Objective. Objectives can be modelled on a 25mm base or represented by a marker.
Controlling Objectives
A player controls an Objective if, at the beginning of the End phase, there are more fighters from their gang within 2" of the Objective than there are enemy fighters. Seriously Injured fighters are ignored for the purposes of controlling Objectives. Objectives cannot be scored in the first round, or until the round after the Alarm is raised if the scenario uses the Sneak Attacks rules.
Loot Cards
Loot cards are bonus Objectives players can complete to earn extra credits or Reputation. Once Objective markers (if any) have been placed, place any additional markers as detailed by the Loot card. Loot cards are scored as soon as their requirements have been met.
Perils Cards
Perils cards represent battlefield conditions and the dangers of the underhive. Once Objective and Loot markers have been placed on the battlefield, the players place Perils markers (if any) on the battlefield.
Setting Up The Battle
Battlefield Set-up
Set up the battlefield as detailed in the Necromunda Rulebook.
Crews
If the battlefield is 36" x 36" or larger, crews are chosen using the Custom Selection (12) method, as detailed in the Necromunda Rulebook. If the battlefield is 24" x 24" or smaller, use Custom Selection (8) instead.
Gang Tactics
Both players now choose two gang tactics. If one player's gang rating is at least 100 credits lower than their opponent's, they may select an additional gang tactic.
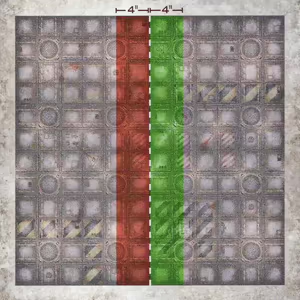
Deployment
The winner of a roll-off can choose to be either the Attacker or the Defender. The Attacker chooses a deployment zone and sets up their crew. If a Deployment card shows more than one deployment zone for a player then they must place at least one fighter in each of the zones indicated.
Reinforcements
A Reinforcements Deployment card uses the rules for Reinforcements as detailed in the Necromunda Rulebook. Reinforcements consist of at least half of the player's crew. D3 Reinforcements will arrive at the end of the End phase of the second round, and in each End phase thereafter.
Sneak Attacks
A Sneak Attacks Deployment card uses the rules for Sneak Attacks, as detailed in the Necromunda Rulebook. Sneak Attacks Deployment cards also use the rules for Reinforcements.
Deployment Cards
| 1. Backstab | 2. Beat Down | 3. Stand-off |
 |  |  |
| 4. Backstage (Reinforcements) | 5. Beat Down (Reinforcements) | 6. Stand-off (Reinforcements) |
 |  |  |
| 7. In Your Face | 8. Sniping Range | 9. Free for All |
 |  |  |
| 10. Ambush | 11. Dome Rush (Sneak Attack) | 12. Home Turf (Sneak Attack) |
 |  |  |
Objective Cards
| 1 | A LESSON IN PAIN | Winning the Battle: If the Attacker has Seriously Injured or taken Out of Action at least half of the Defender's starting crew by the End phase of round 6 then they are the winner. Otherwise the Defender wins. Alternatively, if a player is the only one with fighters still on the battlefield at the beginning of a round then they are the winner. If the battle is using the Sneak Attacks rules then neither player can win until the End phase of the round after the Alarm has been raised. Rewards: Fighters that took part in the battle earn 1 Experience point. The winning gang increases their Reputation by D3. The winning gang adds 2D6x10 credits to their Stash. The losing gang adds D6x10 credits to their Stash. |
| 2 | BURN THEM OUT | Objectives: Starting with the Attacker, the players take turns placing three Objectives in their opponent's deployment zone. Controlling one of the Objectives within your opponent's deployment zone is worth 1 Victory point. Once an Objective has been scored, remove it from the battlefield. Winning the Battle: A player wins by being the first player to reach 3 Victory points, or if they are the only one with fighters still on the battlefield at the beginning of a round. If both players reach 3 Victory points in the same round then the battle continues until only one player has fighters still on the battlefield at the beginning of a round. Rewards: Fighters that took part in the battle earn 1 Experience point. The winning gang increases their Reputation by D3. The winning gang adds 2D6x10 credits to their Stash. The losing gang adds D6x10 credits to their Stash. |
| 3 | CRITTER HUNT | Objectives: Place a single Objective in the centre of the battlefield. Controlling the Objective is worth 1 Victory point. After the Objective has been scored, it immediately moves 3D6" in a random direction as determined by the Scatter dice. If this would place it in Impassable terrain or move it off the battlefield, the scoring player's opponent can place it anywhere on the battlefield instead. Winning the Battle: A player wins by being the first player to reach 3 Victory points, or if they are the only one with fighters still on the battlefield at the beginning of a round. Rewards: Fighters that took part in the battle earn 1 Experience point. The winning gang increases their Reputation by 1. The winning gang adds 2D6x10 credits to their Stash. The losing gang adds D6x10 credits to their Stash. |
| 4 | ESCAPE THE DOME | Winning the Battle: After both crews are deployed, the Defender chooses a battlefield edge. The Attacker wins, if, at the beginning of any End phase they have at least three fighters in base contact with the chosen edge, or if they are the only one with fighters still on the battlefield at the beginning of a round. If the Attacker begins a round with fewer than three fighters on the battlefield, or if the Defender is the only one with fighters still on the battlefield at the beginning of a round then the Defender is the winner. Rewards: Fighters that took part in the battle earn 1 Experience point. The winning gang increases their Reputation by D3. The winning gang adds 2D6x10 credits to their Stash. The losing gang adds D6x10 credits to their Stash. |
| 5 | FLANK 'EM | Objectives: The Attacker chooses one edge and places an Objective at the centre pont of that edge, 6" onto the battlefield. The Defender then places a second Objective In the same position on the opposite battlefield edge. Controlling both of the Objectives is worth 1 Victory point. Winning the Battle: A player wins by being the first to reach 3 Victory points, or if they are the only one with fighters still on the battlefield at the beginning of a round. Rewards: Fighters that took part in the battle earn 1 Experience point. The winning gang increases their Reputation by D3. The winning gang adds 2D6x10 credits to their Stash. The losing gang adds D6x10 credits to their Stash. |
| 6 | KILLBOX | Winning the Battle: In the End phase of round 3 and each End phase thereafter, if the Defender has no fighters within 6" of any battlefield edge then the Attacker is the winner. Alternatively, if a player is the only one with fighters still on the battlefield at the beginning of a round then they are the winner. If the battle is using the Sneak Attacks rules then neither player can win until the round after the Alarm has been raised. Rewards: Fighters that took part in the battle earn 1 Experience point. The winning gang increases their Reputation by D3. The winning gang adds 2D6x10 credits to their Stash. The losing gang adds D6x10 credits to their Stash. |
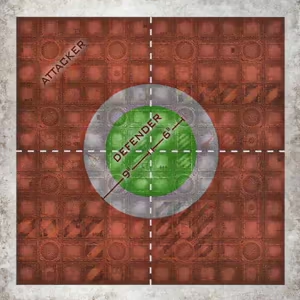
| 7 | KING OF THE HIVE | Objectives: Place a single Objective marker in the centre of the battlefield. Controlling the Objective is worth 1 Victory point. Winning the Battle: A player wins by being the first to reach 3 Victory points, or if they are the only one with fighters still on the battlefield at the beginning of a round. Rewards: Fighters that took part in the battle earn 1 Experience point. The winning gang increases their Reputation by D3. The winning gang adds 2D6x10 credits to their Stash, The losing gang adds D6x10 credits to their Stash. |
| 8 | LAST GANG STANDING | Winning the Battle: If a player is the only one with fighters still on the battlefield at the beginning of a round then they are the winner. If the battle is using the Sneak Attacks rules then neither player can win until the End phase of the round after the Alarm has been raised. Rewards: Fighters that took part in the battle earn 1 Experience point. Fighters still on the battlefield at the end of the battle earn 1 Experience point. The winning gang increases their Reputation by D3. The winning gang adds 2D6x10 credits to their Stash. The losing gang adds D6x10 credits to their Stash. |
| 9 | RUSH 'EM | Objectives: Starting with the Attacker, the players take turns placing an Objective in their opponent's deployment zone. Controlling both of the Objectives is worth 1 Victory point. Winning the Battle: A player wins by being the first to reach 3 Victory points, or if they are the only one with fighters still on the battlefield at the beginning of a round. Rewards: Fighters that took part in the battle earn 1 Experience point. The winning gang increases their Reputation by D3. The winning gang adds 2D6x10 credits to their Stash. The losing gang adds D6x10 credits to their Stash. |
| 10 | SURVIVAL OF THE MEANEST | Winning the Battle: If the Defender has at least one fighter still on the battlefield at the end of round 9 then they are the winner. Otherwise, the Attacker wins. Alternatively, if a player is the only one with fighters still on the battlefield at the beginning of a round then they are the winner. If the battle is using the Sneak Attacks rules then neither player can win until the End phase of the round after the Alarm has been raised. Rewards: Fighters that took part in the battle earn 1 Experience point. The winning gang increases their Reputation by D3. The winning gang adds 2D6x10 credits to their Stash. The losing gang adds D6x10 credits to their Stash. |
| 11 | TUNNEL CLASH | Objectives: Place an Objective In the centre of the battlefield. Starting With the Attacker, both players then place an Objective at least 6' from the central Objective and 12" from any battlefield edge. Controlling at least two of the three Objectives worth 1 Victory point. Winning the Battle: A player wins by being the first to reach 3 Victory points, or if they are the only one with fighters still on the battlefield at the beginning of a round. Rewards: Fighters that took part in the battle earn 1 Experience point. The winning gang increases their Reputation by D3. The winning gang adds 2D6x10 credits to their Stash, The losing gang adds D6x10 credits to their Stash. |
| 12 | TURF WAR | Winning the Battle: In the End phase of round 3, and each End phase thereafter, if one player has fighters within 8" of the centre of the battlefield and their opponent does not then they are the winner. Alternatively, if a player is the only one with fighters still on the battlefield at the beginning of a round then they are the winner. If the battle is using the Sneak Attacks rules then neither player can win until the End phase of the round after the Alarm has been raised. Rewards: Fighters that took part in the battle earn 1 Experience point. The winning gang increases their Reputation by D3. The winning gang adds 2D6x10 credits to their Stash. The losing gang adds D6x10 credits to their Stash. |
Loot Cards
| 1 | BLAZE OF GLORY | Scoring the Loot: After both crews have been deployed and any Perils cards have been applied, randomly choose one of your own fighters (not including the Leader), keeping your choice secret. If in the End phase of any round, the chosen fighter has been Seriously Injured or taken Out of Action by your opponent's Leader then your gang scores this Loot card. Rewards: Your gang adds D6x10 credits to their Stash. |
| 2 | FINISH THEM OFF | Scoring the Loot: In the End phase of any round, your gang will score this Loot card if at least three enemy fighters have been taken Out of Action with the Coup De Grace (Simple) action in the battle so far. Rewards: Your gang adds D6x10 credits to their Stash. |
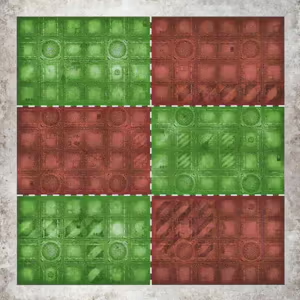
| 3 | GOT IT COVERED | Scoring the Loot: Divide the battlefield up into four equal quarters. In the End phase of round 3, or any round thereafter, if you have a fighter within 2" of the centre of each of the four quarters, your gang will score this Loot card. Rewards: Your gang increases their Reputation by 1. Your gang adds D6x10 credits to their Stash. |
| 4 | KIDNAP JOB | Scoring the Loot: After both players have set up their crews and any Objectives have been placed, place a Hive Dweller in the centre of the battlefield (this can be represented by a marker or an appropriate model). The Hive Dweller cannot be harmed by attacks (it is assumed they keep their head down) and counts as a loot casket for the purposes of being moved (see the Necromunda Rulebook). If one of your fighters 'carrying' the Hive Dweller moves into base contact with a battlefield edge, they may remove it from the battlefield to score this Loot card. Rewards: Your gang adds 2D6x10 credits to their Stash. |
| 5 | LOOT THEIR CORPSES | Scoring the Loot: Immediately after making a Coup De Grace (Simple) action, your fighters may loot the dead. Fighters may not loot the dead if they made a Charge (Double) action or Fight (Basic) action this activation. When they loot the dead, place a marker on their Fighter card. Once at least three of these markers have been accumulated by your crew, your gang will score this card. Rewards: Your gang adds D6x10 credits to their Stash. |
| 6 | SABOTAGE | Scoring the Loot: In the End phase of any round, if two of your fighters are in your opponent's deployment zone, and neither fighter moved or made any attacks during their activation then your gang Will score this Loot card. If the battle is using the Sneak Attacks rules then this card cannot be scored until the End phase of the round after the Alarm has been raised. Rewards: Your gang adds D6x10 credits to their Stash. |
| 7 | SEARCH THE AREA | Scoring the Loot: If in the End phase of round 3, or any End phase thereafter, your gang has a fighter in base contact with each of the four edges of the battlefield then your gang will score this Loot card. Rewards: Your gang adds 2D6x10 credits to their Stash. |
| 8 | SETTLE A SCORE | Scoring the Loot: After both crews have been deployed and any Perils cards have been applied, randomly choose one of your opponent's fighters (not including the enemy Leader), keeping your choice secret. In the End phase of any round, if the chosen fighter has been Seriously Injured or taken Out of Action then your gang scores this Loot card. Rewards: Your gang increases their Reputation by 1. |
| 9 | THE CHALLENGE | Scoring the Loot: If an enemy (Champion) is Seriously Injured or taken Out of Action, your gang will score this Loot card. This card may only be scored once. If the enemy crew does not include a (Champion), discard this card and draw another Loot card. Rewards: Your gang adds D6x10 credits to their Stash. |
| 10 | THE HIT | Scoring the Loot: If the enemy (Leader) is Seriously Injured or taken Out of Action then your gang will score this Loot card. If the enemy crew does not include a (Leader), discard this card and draw another Loot card. Rewards: Your gang increases their Reputation by 1. Your gang adds D6x10 credits to their Stash. |
| 11 | THE PACKAGE | Scoring the Loot: At the beginning of the battle, after both crews have deployed, choose one of your fighters and give them a marker to represent the package. In the End phase of any round, if the fighter carrying the package is in base contact with a battlefield edge in your opponent's deployment zone (or in the centre of the battlefield if your opponent's deployment zone has no battlefield edges), they may remove the marker from their Fighter card and your gang score this Loot card. If the battle is using the Sneak Attacks rules then this card cannot be scored until the round after the Alarm has been raised. Rewards: Your gang adds D6x10 credits to their Stash. |
| 12 | WIPE THEM OUT | Scoring the Loot: If at least a third of your opponent's crew is Seriously Injured or taken Out of Action then your gang will score this Loot card. Rewards: Your gang adds D6x10 credits to their Stash. |
Peril Cards
| 1 | AMMO SHORTAGE | For the duration of this battle, all weapons gain the Scarce Weapon trait and lose the Plentiful Weapon trait If they have it. In addition, Heavy and Special weapons (as denoted by the Gang House Lists and the Trading Post) must re-roll successful Ammo checks. | ||||||||||
| 2 | FALLING DEBRIS | For the duration of this battle, each time a weapon with the Blast (X") trait is used (provided it does not also have the Gas, Flash or Smoke Weapon trait), all fighters within 12" of the edge of the Blast marker must make an Initiative check. If this check is failed, they suffer an automatic Str 1, AP -, Damage 1 hit and become Pinned. | ||||||||||
| 3 | GAS LEAK | For the duration of this battle, weapons with the Blaze Weapon trait set fighters on fire on a 3+ instead of a 4+. When a fighter armed with a weapon with the Blaze Weapon trait is taken Out of Action, centre the 3" Blast marker on them before removing the fighter from the battlefield. All fighters that are beneath the Blast marker must check to see if they are set on fire too. | ||||||||||
| 4 | HIVE CRITTERS | Before deploying crews, players take turns, starting with the Attacker, placing D3+1 Hive Critters on the battlefield (these can be represented by markers or appropriate models). Critters should be placed anywhere outside of Impassable terrain and at least 2" away from an already placed Critter or a battlefield edge. In the End phase, each Critter will move 2D6" in a random direction, stopping if they come into contact with Impassable terrain or a fighter. This movement can take them up or down levels, ignoring any vertical distances. After a Critter has moved, any fighters within 1" of its final position takes an automatic Strength 3, AP -, Damage 1 hit. Critters cannot be damaged by attacks (it is assumed there are always more of them no matter how many are killed!). | ||||||||||
| 5 | HIVE PLAGUE | After crews have been deployed, both players roll a D3 and randomly select this many fighters from their crew. These fighters begin the battle with a Flesh Wound. | ||||||||||
| 6 | HORRORS IN THE DARK | If, when a fighter activated, they are not within 8" of any other fighters (friend or enemy), roll a D6 on the following table:
| ||||||||||
| 7 | LAIR OF THE BEAST | Before crews are deployed, both players, starting with the Attacker, take turns placing D3+1 Beast Lair markers (see the Necromunda Rulebook) onto the battlefield. | ||||||||||
| 8 | PITCH BLACK | This battle uses the Pitch Black rules (see the Necromunda Rulebook). | ||||||||||
| 9 | POISONED AIR | For the duration of this battle, fighters cannot perform more than one Move (Simple) action during their activation unless they are equipped with a Respirator. | ||||||||||
| 10 | RADIOACTIVE RAIN | For the duration of this battle, all weapons gain the Rad-phage Weapon trait. If a fighter is using a weapon that already has the Rad-phage Weapon trait then they may re-roll the dice to determine if successful hits cause additional Flesh Wounds. | ||||||||||
| 11 | ROTTEN WALLS | For the duration of this battle, fighters may target enemies through Solid Terrain features with ranged attacks. The target must be within 12" of the fighter, and the fighter cannot use a weapon with the Gas, Template, or Blast Weapon trait. Attacks made against enemies through Impassable terrain only ever hit on a natural roll of 6 on the to hit dice. | ||||||||||
| 12 | UNSTABLE GROUND | For the duration of this battle, fighters must re-roll successful Initiative checks to see if they fall from ledges and levels. In addition, when making a Charge (Double) action, fighters must roll two D3 and choose the lower dice result to determine their final Charge distance. |