Assault on Precinct-Fortress 17
RAW ✔️ Source: White Dwarf 447, Assault on Precinct Fortress-17 (10/2019)
In the anarchic world of the Necromunda underhive, even the law enforcers are not safe from the predations of vicious gangs. Having slain the leader of an outlaw gang, the Enforcers of Precinct-Fortress 17 have now come under attack with no hope of rescue.
The underhives of Necromunda are dangerous places at the best of times, with countless rival gangs embroiled in bitter wars against each other. Some squabble over territory or trading rights, others fight age-old grudges or battle each other for revenge. Whatever the cause of these underhive wars, it falls to the Enforcers – the lawmen and women of the hive – to try to maintain some semblance of order. Equipped with the best weapons and wargear the hive can offer, they try to ensure that the underhive gangs are kept in line or, at the very least, that their activities do not interfere with trade and industry. Sometimes, however, a gang leader will get it into their head that the Enforcers in their area have stuck their noses into their affairs just once too often. Should they rally enough support for their grievance from other local gangs, times could get very difficult indeed for the Enforcers…
We're Calling You Out, Lawman!
Assault on Precinct-Fortress 17 is a mini-campaign for Necromunda featuring five exclusive scenarios, the rules for which can be found over the next few pages. Mini-campaigns offer a middle ground between one-off narrative scenarios and full-on campaigns. In effect, a mini-campaign is a series of short scenarios linked together with a little bit of downtime between each one and is usually connected by a strong narrative theme. One of the main advantages of a mini-campaign is that it can be played out in one or two evenings or over a single afternoon, but it still delivers a fun, story-driven experience and offers players lots of important tactical decisions before they reach its conclusion. The only decision you need to make now is whether you'll play as the tooled-up but outnumbered law enforcers or as the gangers out for revenge. Precinct-Fortress 17 awaits!
Fighting The Mini Campaign
Precinct-Fortress 17 has come under attack! This remote outpost of Lord Hewlmar's law is located where the sprawling ruin of the underhive proper begins, and under the command of Captain Torg Chancer it has long been a bulwark against disobedience. With no support coming any time soon, Chancer and his Enforcers must hold out through the long underhive night cycle as an alliance of outlaw gangs known as the Thunderboys circle in the darkness, intent on exacting revenge for the murder of their former leader by one of Chancer's patrols. The Enforcers have the advantage of superior weaponry and the sturdy walls of their fortress, but the gangers have the numbers – and a cunning that only comes from a life lived in the savage underhive.
Assault on Precinct-Fortress 17 is a mini-campaign that follows a gang attack on an isolated underhive Precinct-Fortress. Players take on the role of either the Enforcers (the defender) or the Outlaws (the attacker). Assault on Precinct-Fortress 17 is made up of several linked scenarios all played on the same battlefield. Each scenario lasts for a set number of rounds with a number of set goals. After each scenario is completed, both sides have a quick recovery period to marshal their troops or set their defences before the next one commences. Players must not only try to win the scenario they are fighting but also preserve their forces for future scenarios in the hopes of winning the overall campaign.
Scenarios
Assault on Precinct-Fortress 17 is played out over several scenarios, each one affecting the ones that come after. The campaign begins with First Scenario: Night Falls and concludes with Final Scenario: Hold Until Dawn, with three optional scenarios that can be played between the two. Players should agree beforehand how many of the optional scenarios they wish to play using the following as a guide:
- One Optional Scenario: This puts the pressure on the attacker to overwhelm the defender sooner with fewer opportunities to whittle down the precinct's defences and
- Two Optional Scenarios: This gives both attacker and defender an equal chance to hold the line or break through the precinct's defences and so is equally challenging for both the attacker and the defender.
- Three Optional Scenarios: This puts the pressure on the defender, as their resources must be stretched further while the attacker has more chances to break the precinct's defences.
If only one or two of the optional scenarios are being played, the attacker chooses which ones are used. If more than one optional scenario is being played, the attacker chooses the order in which they will be played. Once the players have decided how many of the optional scenarios they will use, the next step is to set up the battlefield.
The Battlefield: Precinct Fortress17
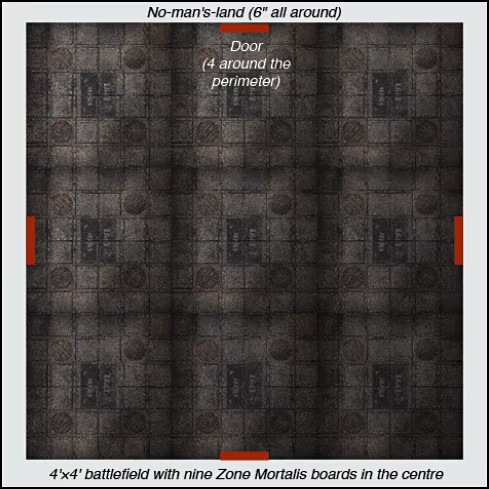
The mini-campaign takes place in and around Precinct-Fortress 17, which is the basis for the battlefield. The game should be played on a 4'×4' battlefield with the defender setting up nine 1' square Zone Mortalis tiles in its centre to create a 3'×3' square. (If you wish, a 3'×3' area of 3D Sector Mechanicus terrain can be set up instead, provided it can easily be divided into 12"x12" squares. Alternatively, you may wish to use the 3D Zone Mortalis tiles available from Forge World.) The tiles represent the precinct, and the area around them is the no-man's-land of the underhive. Where the edges of these tiles meet no-man's-land represents the precinct's outer walls, and as such they are impassable terrain. The defender should then add four of the wider Necromunda: Underhive doors to the outer edge of the precinct, placing one door in the middle of each of the precinct's four sides. These doors represent the only ways through the outer walls of the precinct.
Next, the defender adds up to six internal doors and other terrain (such as barricades and ammo crates) to the precinct depending on the terrain in their collection. One tile or part of a tile must also be designated as the Gaol with a door sealing it off from the rest of the precinct. When setting up the precinct, the defender should make an effort to make the central tile as defensible as possible, as reaching this area will often be one of the attacker's objectives.
Once the defender has set up the doors and other terrain, the attacker can add up to four ductways to the precinct.
Crews: Chancer's Enforcers
Precinct-Fortress 17 is a remote posting with only a skeleton crew of officers and support staff. The defender creates a gang up to a value of 1500 Credits using the Enforcer Gang list from page 26 of Necromunda: The Book of Judgement. Their gang will start with a Reputation of 20. Their gang must include a Rogue Doc, Ammo Jack and Slopper (see page 85 of Necromunda: Gangs of the Underhive), all of which must be represented by models, as they will take part in the defence. These models do not cost the defender any Credits to hire but do count toward their allotment of Hangers-on. When equipping their gang, they can choose items from the Trading Post with a Rarity of 12 or less. The defender can give their Champions two advancements and their Leader three advancements.
The defender's gang cannot include any Hired Guns apart from those detailed above. However, the precinct's gaol is also currently home to a number of miscreants who might, during the course of the fighting, find themselves conscripted by the Enforcers. The defender should create a Bounty Hunter and two Underhive Scum Hired Guns to represent these prisoners.
Crews: Thunderboys Alliance
An alliance of Outlaw gangs (see page 38 of Necromunda: The Book of Judgement) have gathered together to storm the precinct and kill everyone in their way. The attacker creates a gang using any gang list (this could even be a gang of corrupt Enforcers) up to a value of 3000 Credits. Their gang will start with a Reputation of 20. When equipping their gang, they can choose items from the Black Market or the Trading Post with a Rarity or Legality of 9 or less. The attacker can give each of their Champions one advancement and their Leader two advancements. Their gang may also include Brutes, Bounty Hunters and other Hired Guns as normal for an Outlaw gang.
The Prisoners
While the door to the Gaol is closed the prisoners do not gain Ready markers and cannot take actions. The prisoners can be let out to aid in the defence at any time during a scenario by opening the door to their cell with a fighter. When the door is opened give Ready markers to each prisoner; for the rest of the current scenario the prisoners are now counted as part of the defender's gang. However, prisoners are far from the most reliable allies. If a prisoner activates more than 6" from an Enforcer, there is a chance they will escape custody. Roll a D6. On the roll of a 1, the attacker immediately takes control of them and they become part of their gang for the remainder of the current scenario, at the end of which they are removed from the campaign having escaped.
After the prisoners have been released, provided they didn't escape custody as described above, they can either be set up normally as part of the defender's gang in subsequent scenarios, or be put back in their cell, as decided by the defender.
More Than Two Players
If more than two players are involved in the mini-campaign then additional players join the attacking side. The attackers divide the 3000 Credits and 20 Reputation evenly between themselves (i.e. in a three player campaign two players would be the attackers, each with 1500 Credits to spend on their gangs and a Reputation of 10 each) and each builds their own gang.
Deployment: Set Defence
At the start of each scenario the defender begins by setting up their defence. This involves deploying models, setting any traps or other defences they might have, and setting up Rally Points. Guidelines for each of these steps are detailed in each individual scenario. Unless otherwise noted, the defender can always field their entire gang.
For the duration of the mini-campaign, the defender has the Home Turf advantage and does not need to make Bottle checks.
Deployment: Formulate Attack
Once the defender has set up, it is time for the attacker to formulate their attack. This involves organising their forces, deploying fighters, and deciding on the number of assault waves they will commit to the attack. Guidelines for each of these steps are detailed in each individual scenario. Unless otherwise noted, the attacker can always field their entire gang.
Assault Waves
The attacker can use their numerical advantage to overwhelm the defender. At the beginning of the campaign, the attacker has three Assault Waves to call upon.
- Each Assault Wave allows the attacker to recycle some of their Gangers and Juves once during a battle.
- The attacker must decide if they are going to commit an Assault Wave at the start of each battle, which can then be activated during the game.
- If, at the end of a battle, an Assault Wave has not been activated, it is wasted and removed from the attacker's total.
During a battle, the attacker can activate an Assault Wave by declaring their intention to do so during the End phase of any round, before Seriously Injured fighters make Recovery rolls.
Any of the attacker's Gangers and Juves who have been taken Out of Action during this battle (including any who have been killed) may be returned to the battlefield, deploying within 6" of any battlefield edge during the Priority phase of the next round, after rolling for Priority but before fighters are Readied.
Seriously Injured attackers can also be recycled. Instead of making a Recovery roll in the End phase, they are removed from the battlefield and then placed within 6" of any battlefield edge during the Priority phase of the next round, after rolling for Priority but before fighters are Readied.
Rally Points
The defender knows they are about to fight a desperate battle and has prepared accordingly. At the start of the campaign the defender has three Rally Points. These are fall back points where stores of medical supplies and ammo have been piled along with non-combatants like servitors to aid the Enforcers. Rally Points can be represented either by a token or appropriate piece of terrain, such as a pile of ammo crates.
A Rally Point grants a number of benefits to nearby defenders:
- Medical Assistance: Defenders within 3" of a Rally Point count as having Assistance from a friendly fighter when making Recovery Tests (see page 73 of the Necromunda Rulebook). At the end of a scenario any Seriously Injured defender within 3" of a Rally Point do not need to test to see if they succumb to their injuries.
- Tactical Retreat: Defenders within 3" of a Rally Point automatically pass Rally Tests (see page 73 of the Necromunda Rulebook). Broken fighters can move toward a Rally Point instead of seeking cover, even if it would leave them in the open or take them closer to enemy fighters.
- Reloads: Defenders within 3" of a Rally Point count their weapons as having the Plentiful Trait and ignore the Scarce and Limited traits on their weapons.
Rally Points do not count as cover and do not impede movement. They cannot be targeted by shooting, however, if an attacker is in base contact with a Rally Point they can destroy it by performing the Smash Apart (Double) action. Once a Rally Point has been destroyed it is removed from the battlefield and from the defender's total number of Rally Points, and is therefore not available to them in future scenarios.
The centre point of the precinct's central tile also counts as a Rally Point. This Rally Point is in addition to the three the defender can place throughout the precinct and cannot be destroyed by the attackers.
Outcomes: Overrunning The Precinct
Precinct-Fortress 17 has become a battleground with both sides fighting for its corridors and chambers. At the end of each battle, there is a chance that part of the precinct has fallen to the attackers or that the defenders have fought their way back into an area that was taken previously. Each scenario will detail victory conditions for both sides, allowing the attacker to Overrun precinct tiles or for the defender to Reclaim previously Overrun tiles.
When a tile is Overrun, it is no longer considered part of the precinct, and the defender cannot set up fighters, Rally Points, barricades, or traps in that tile before the following battle or repair any of the tile's doors in the Respite period. Doors in Overrun tiles are always unlocked and can be either open or closed when battle commences, as decided by the attacker.
Lasting Injuries, Recovery, And Medical Escort
During the course of Assault on Precinct-Fortress 17, fighters will be wounded and killed. Sometimes, though, they might be able to carry on into the next battle.
When a fighter is taken Out of Action during the battle, or if any fighters Seriously Injured at the end of the battle succumb to their wounds, roll for them as described below.
Attacking Fighters
If one of the attacker's Gangers or Juves is Taken Out or succumbs to their injuries, do not roll on the Lasting Injuries table. Instead, roll a D6:
- On a roll of 1-4, treat the fighter as if they have suffered a Memorable Death result on the Lasting Injury table.
- On a 5 or 6, treat the fighter as if they have suffered an Out Cold result on the Lasting Injury table.
If the attacker's Leader or any of their Champions is Taken Out or succumbs to their injuries, roll on the Lasting Injuries table as normal, then roll a D6:
- On a roll of 1-3, the fighter suffers the effects of the Lasting Injury as normal.
- On a roll of 4-6, the fighter suffers the effects of the Lasting Injury, but does not have to go into Recovery.
Defending Fighters
The defender does not have the luxury of being able to give fighters the time to recover; all hands are needed for the defence of the precinct, and all but the dead will contribute their efforts!
If any of the defender's fighters are taken out or succumb to their injuries, roll on the Lasting Injuries table as normal and apply the results to that fighter. However, any fighters that go into Recovery must still take part in the next battle. These fighters must be placed within 3" of a Rally Point, representing the fighter being laid up and undergoing treatment. They begin the battle Prone and Pinned, and if they stand up, move, or are moved more than 3" from the Rally Point, they become Prone and Seriously Injured.
Critical Injuries
Should the attacker's Leader or any of their Champions, or any of the defender's fighters, suffer a Critical Injury result on the Lasting Injury table, the following rules apply.
If they are an attacker, there is no time to take them to the doc, and they will die unless the attacker's gang has a Rogue Doc to tend to them.
If they are a defender then they can only be saved by the defender's Rogue Doc, if the Hanger-on is still alive.
Respite
At the end of each scenario, it is likely some of the defender's fighters might have suffered Lasting Injuries, while others might have weapons that are out of ammo, and the precinct itself might have taken damage. These conditions are not automatically removed between games to better reflect the desperate situation.
Instead, at the end of each battle, immediately after the Wrap-Up, there is a period of Respite, giving the defender a chance to patch up some of their wounded, repair damaged terrain, and restock ammo. Each action performed during Respite, however, requires committing a fighter to the task. Fighters that are in Recovery cannot be used. During the Respite period, each of the defender's fighters can do one of the following.
- Repair: The fighter makes emergency repairs to the precinct's defences. Replace a single destroyed or damaged door, or add D3 barricades to the battlefield.
- Patch-Up: The fighter administers emergency medical aid to a comrade. One fighter that went into Recovery during the previous battle immediately comes out of Recovery.
- Restock: The fighter trawls through the precinct's armoury searching for uncommon ammo. Reload D3 weapons with the Scarce trait that are currently out of ammo or add D3 Booby Traps (Frag, Melta, or Gas as chosen by the defender) to the defender's Stash.
Once the Respite period has been completed, the players move on to the next scenario.
Limited Ammo
The defenders have a large armoury at their disposal, but ammo is still a limited resource. Any of the defender's ranged weapons that have the Scarce trait cannot be reloaded between battles unless a Reload action is performed for the weapon during Respite (see above).
Tactics Cards
The inclusion of Gang Tactics Cards in Assault on Precinct-Fortress 17 is optional and should be decided by the players before the first battle. If the players choose to include Tactics Cards, then each player can select two cards at the beginning of each scenario.
Winning The Mini Campaign: Victory Or Defeat
There is no middle ground in the Enforcer's desperate stand against the Thunderboys, and neither side will be offering any quarter or looking for any from their foes. To see which side has won the campaign, tally up the survivors at the end of the final scenario.
At the end of Scenario Five: Hold until Dawn, if there are no defenders left on the battlefield who are not Seriously Injured, the attacker is the winner. The Thunderboys loot the bodies of their foes before burning the precinct to the ground and retreating back into the wastes to celebrate their victory over Lord Helmawr's rule.
At the end of Scenario Five: Hold until Dawn, if there is at least one defender left on the battlefield who is not Seriously Injured, the defender is the winner. The Enforcers breathe a collective sigh of relief as reinforcements arrive to see off the Thunderboys, leaving the Palanites to take stock of the damage and count their dead.